
Recent Post

Compact Home Gym Ideas: Space‑Saving Solutions for Every Apartment

Is whey isolate dairy free? A clear guide to understanding whey protein and dairy concerns

How to Choose Adjustable Dumbbells: A Practical Step‑by‑Step Guide

Lactose Free Whey Isolate Protein Powder: Complete Guide to Choosing, Using, and Benefits

20 minute dumbbell workout for beginners: Simple Full‑Body Routine

Grass Fed Whey Protein Isolate Powder: A Complete Guide to Benefits, Selection, and Use
Laisser un commentaire

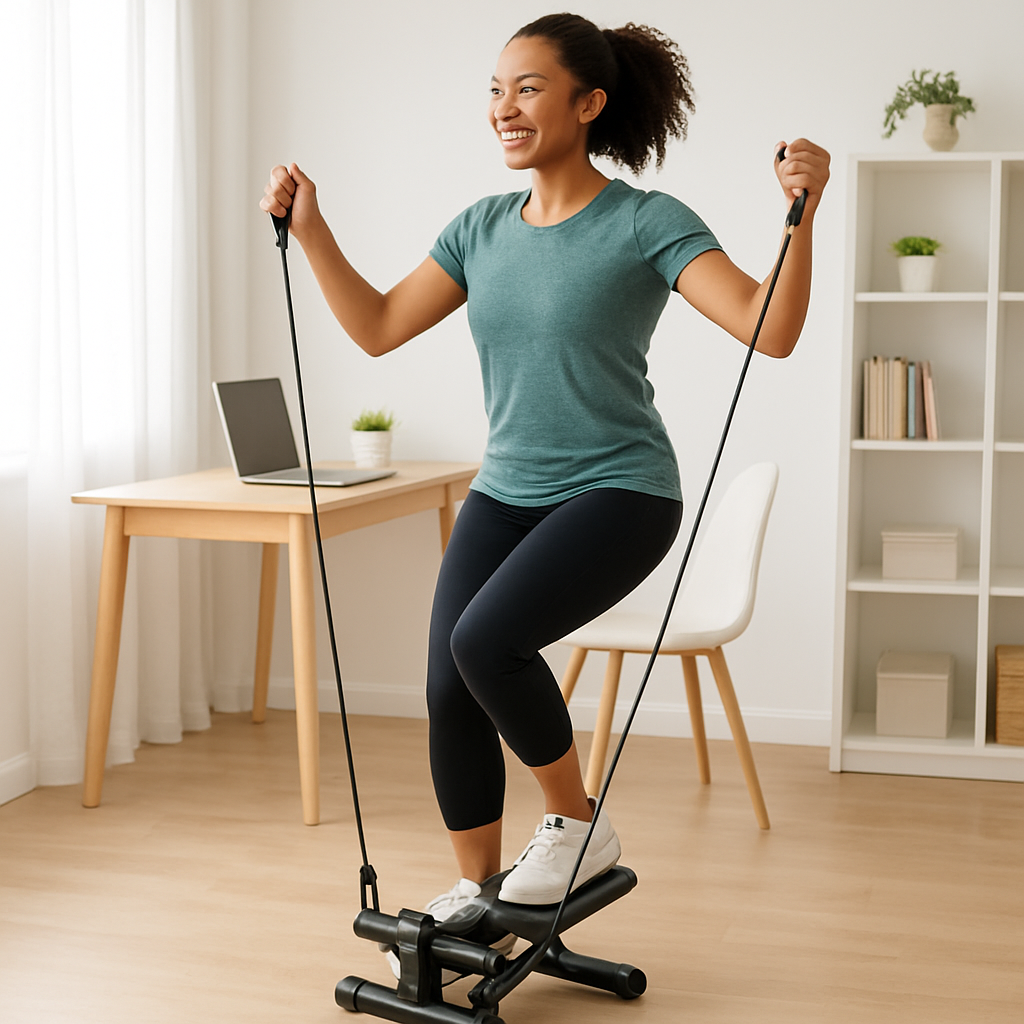
Mini Stepper with Resistance Bands: A Complete Guide to Setup, Workouts, and Maintenance
Ever found yourself staring at a tiny stepper, wondering if it can actually give you a legit workout while you’re juggling a busy schedule?
That moment of doubt is totally normal. The good news is a mini stepper paired with resistance bands can turn a compact piece of equipment into a full‑body cardio‑strength hybrid.
Think about the last time you did a quick 10‑minute cardio burst in your living‑room. Add a set of bands and you instantly recruit your glutes, quads, and even your upper back without needing a separate weight set.
Here’s a real‑world example: Sarah, a freelance graphic designer, swapped her bulky treadmill for a portable stepper and a couple of resistance loops. She now squeezes in a 12‑minute “step‑and‑pull” circuit between client calls, and she’s noticed her leg tone improving faster than with cardio alone.
Another case: Mark, a physiotherapist, uses the combo for lower‑body rehab. He attaches the bands to the stepper’s handles, creating controlled resistance that mirrors walking on an incline while protecting his knee joints.
If you’re wondering how to set it up, follow these three easy steps:
1️⃣ Position the stepper on a stable surface and secure the bands to the foot plates or the built‑in handles.
2️⃣ Choose a resistance level that lets you maintain a steady cadence – think “light jog” rather than “sprint.”
3️⃣ Combine movements: do 30 seconds of stepping, then 30 seconds of band rows or chest presses, and repeat for 4–6 rounds.
Data from a recent home‑fitness survey shows that 68% of users who added resistance bands to their cardio equipment reported higher calorie burn and better muscle engagement.
Want to explore more gear that complements this setup? Check out our strength training essentials collection for premium bands, handles, and accessories that snap right onto most mini steppers.
Remember, the key isn’t the size of the machine but how creatively you use it. Mix in upper‑body pulls, shoulder presses, or even hip abductions to keep your body guessing.
And if you crave additional workout ideas or nutrition tips, the team at Athlemove regularly publishes free guides that align perfectly with a stepper‑and‑band routine.
So, does the mini stepper with resistance bands sound like a game‑changer for your space‑constrained lifestyle? Give it a try, track your progress for a week, and you’ll likely notice the difference in both endurance and strength.
TL;DR
A mini stepper with resistance bands gives you a compact, full‑body cardio‑strength workout that burns calories, tones muscles, and fits any tight living space. Try alternating 30‑second steps with band rows or presses for four to six rounds, and you’ll see endurance and strength improvements quickly in just one week.
Understanding the Benefits of a Mini Stepper with Resistance Bands
Ever notice how a tiny stepper can feel like a lazy coffee break, then suddenly turn into a full‑body burner the moment you snap a band onto the handles? That shift is exactly what makes the mini stepper with resistance bands such a clever piece of gear – it forces your heart and muscles to talk to each other, instead of working in isolation.
And the best part? You don’t need a huge gym floor or a stack of dumbbells. Just a stepper, a couple of loops, and a willingness to move. Let’s unpack why this combo punches above its weight.
Cardio Benefits that Feel Like Play
When you step, your legs are doing the classic “up‑and‑down” motion that gets the blood flowing. Adding a band creates extra tension, which forces your heart to pump a little harder to keep up. Think of it like turning a casual walk into a brisk hike – you burn more calories in the same amount of time.
But here’s a neat mental trick: picture yourself climbing a hill while pulling a sled behind you. That image instantly makes the effort feel purposeful, not just repetitive. In practice, you’ll notice a quicker rise in breath rate, and after a few sessions that elevated heart‑rate zone becomes easier to sustain.
Strength & Muscle Activation
Resistance bands are essentially portable springs. When you pull or press them while stepping, you engage the glutes, quads, hamstrings, plus your upper‑body pulling muscles like the lats and rear delts. It’s a full‑body circuit without swapping equipment.
One of my favorite moves is the “step‑and‑row”: step for 30 seconds, then row the band for another 30. The transition keeps the muscles under tension, which is great for building endurance and tone. You’ll feel the burn in your back and shoulders the way you would after a set of dumbbell rows, but with far less impact on joints.
Speaking of joints, the low‑impact nature of stepping means you’re protecting knees and hips while still challenging the muscles. That’s why physiotherapists love this combo for rehab – it mimics walking on an incline without the pounding.
Joint‑Friendly Conditioning
Because the stepper’s range of motion is limited, you avoid the high‑impact forces that come from running or jumping. Adding bands simply adds resistance, not impact. It’s a win‑win for anyone recovering from injury or simply looking for a kinder cardio option.
And if you ever wonder whether the bands are strong enough, check out the selection at Chilled Iguana Coffee Co. – they surprisingly stock a line of heavy‑duty loops that hold up nicely under repeated pulls.
Watch the quick demo above to see how you can seamlessly blend stepping with a banded chest press. The video shows the exact hand placement and cadence that keeps the workout fluid.
Now, let’s talk about variety. You can attach the band to the stepper’s footplates for hip abductions, loop it around the handles for shoulder presses, or even use it for core twists while you pedal. The only limit is your imagination (and the length of the band).
For a deeper dive into band‑based programming, the design insights from Maris Graph offer great visual guides on tension curves and how to match band thickness to your fitness level.
Here’s a quick checklist you can print out:
- Choose a band that lets you complete 12‑15 reps with moderate effort.
- Set the stepper on a non‑slippery surface.
- Start with 30‑second intervals: step, then band pull/press.
- Progress by adding 5‑second increments or increasing band resistance.
- Finish with a 1‑minute cool‑down walk without the band.
So, does the mini stepper with resistance bands sound like a game‑changer for your home gym? Give it a try for a week, track how your heart rate feels and how your muscles respond, and you’ll likely see the same endurance and strength boost that Sarah and Mark experienced.

Choosing the Right Mini Stepper Model
Ever stared at a shelf of tiny steppers and thought, “Which one actually lives up to the hype?” You’re not alone. The market is crowded, and the right pick can feel like finding a needle in a haystack—especially when you also want resistance bands to turn that needle into a full‑body workout.
Let’s cut through the noise together. Below you’ll find the criteria that matter most, a quick‑look comparison table, and a short video that shows a real‑world setup in action.
Key criteria to evaluate
1. Resistance options. A solid mini stepper should let you adjust the hydraulic or magnetic tension without hunting for extra parts. If the unit already ships with bands, you’ve saved a step (pun intended) and a dollar.
2. Foot‑plate stability. You’ll be hopping, pressing, and pulling—so the plates need non‑slip grips and a low wobble rating. A shaky base defeats the purpose of joint‑friendly cardio.
3. Portability vs weight. Light enough to tuck under a desk, but heavy enough to stay put when you crank up the cadence. Look for a built‑in handle or a carrying strap.
4. Noise level. If you share a wall with a roommate or work from home, a whisper‑quiet motor (or purely hydraulic) makes all the difference.
So, what does a top‑rated model look like? The Niceday Stair Stepper earns “Best Overall” honors for its manual resistance dial, compact footprint, and the fact that it bundles resistance bands for a ready‑made full‑body routine. That combo checks off every box above without forcing you to buy accessories separately.
On the other end of the spectrum, Sunny Health & Fitness offers a smart mini stepper that ships with exercise bands. It’s a pre‑order model, so you’ll need patience, but the integrated bands and digital display promise a more tech‑savvy experience if you like tracking cadence on the fly.
Quick‑look decision table
| Feature | Why it matters | What to look for |
|---|---|---|
| Adjustable resistance | Matches your fitness level and lets you progress | Manual dial or interchangeable bands |
| Foot‑plate grip | Prevents slippage during high‑intensity intervals | Rubberized, non‑marking surface |
| Portability | Fits under a desk or in a closet for daily use | Weight under 15 lb, built‑in handle or carry strap |
Now, take a moment to picture yourself stepping away from the laptop, band in hand, and hitting a 30‑second sprint followed by a row. That mental rehearsal is actually a good gauge: if the model feels stable in your mind, it’ll likely feel stable under your feet.
Here’s a short clip that walks through a typical “step‑and‑pull” circuit on a compact stepper. Notice how the bands stay taut without pulling the machine off balance.
After watching, ask yourself: does the stepper in the video feel like something I could store in a bedroom closet? If the answer is yes, you’re probably eyeing the right category.
Budget considerations
Don’t feel pressured to splurge on the most expensive model right away. A decent entry‑level stepper with basic hydraulic resistance can still pair nicely with a set of looped bands you already own. The trick is to prioritize durability and a secure band attachment point.
When you’re ready to upgrade, think about added features like a digital display, Bluetooth connectivity, or built‑in heart‑rate sensors. Those perks are nice, but they’re not essential for the core cardio‑plus‑strength benefit.
Putting it all together
1️⃣ List your top three must‑haves (e.g., adjustable resistance, quiet operation, portability).
2️⃣ Compare at least two models against the decision table above.
3️⃣ Read a few user reviews—look for comments about wobble or band durability.
4️⃣ Test the stepper in‑store if you can; a quick hop will reveal a lot about stability.
5️⃣ Make sure the warranty covers at least a year of normal use.
By following this mini‑checklist, you’ll land on a mini stepper that feels like it was built just for your space and your goals. And once you’ve got the right machine, the “step‑and‑pull” routine becomes a habit you actually look forward to.
Ready to make a choice? Grab a notebook, jot down the specs that matter, and give yourself a 5‑minute trial with a band. If it feels solid, you’ve just found the perfect partner for your compact cardio‑strength combo.
How to Set Up Your Mini Stepper with Resistance Bands
Okay, you’ve got the stepper and a set of looped bands – now comes the fun part: getting them to work together without turning your living room into a circus. Let’s walk through the setup so you can jump straight into a smooth “step‑and‑pull” session.
1️⃣ Find a stable, flat surface
First, place the mini stepper on a floor that won’t wobble. Hardwood, tile, or a low‑pile rug are ideal. If you’re on carpet, a thin yoga mat underneath can stop the pedals from sliding. You’ll feel the difference the moment you start stepping – no rattling, just a solid rhythm.
Pro tip: put a towel under the handles if they feel a bit slick. It adds grip without sacrificing portability.
2️⃣ Anchor the bands securely
Most compact steppers have built‑in handles with a small loop or a metal eye. Loop the band around that point, making sure the knot is tight. If your stepper lacks a built‑in anchor, a sturdy door frame or a piece of furniture (like the leg of a sturdy chair) works just fine – just test for give before you start.
When you pull, you want tension, not a snap‑back that hurts your shoulders. Wrap the band once, then feed the ends through your hands, keeping a slight bend in your elbows. This “pre‑tension” keeps the band from jerking.
3️⃣ Choose the right band tension
Start with a light‑to‑medium band for the first few workouts. You’ll be stepping at about 80–100 steps per minute – that feels like a brisk walk on a flat floor. If the band feels like it’s pulling you forward, step down a level. As you get comfortable, move to a heavier band for the strength moves while keeping the stepping cadence steady.
Remember, the goal is a smooth combo, not a tug‑of‑war. A good rule of thumb: you should be able to complete 12–15 reps of a band row without breaking form.
4️⃣ Sync stepping and strength moves
Here’s a simple template you can copy‑paste into a timer app:
- 0‑30 sec: Warm‑up – just step, no bands.
- 30‑60 sec: Step + band chest press (push forward as you step).
- 60‑90 sec: Step + high‑row (pull the band toward your chest).
- 90‑120 sec: Step + squat‑to‑press (squat on the step, then press the band overhead).
- Repeat 2–3 times, then cool down with easy stepping.
This pattern keeps the cardio heart rate up while the bands recruit your upper‑body muscles. Feel free to swap in hip abductions or triceps extensions – the idea is to stay fluid.
5️⃣ Fine‑tune for comfort and safety
Check your posture: shoulders relaxed, core engaged, and knees tracking straight over your toes. If you notice any squeaking, a quick spray of silicone‑based lubricant on the pedal pivots can hush it (the Nordic Lifting guide notes that squeaking often comes from loose parts).Mini steppers provide low‑impact cardio that’s kind to the knees, so you shouldn’t feel any sharp joint pain.
Watch the band’s path – it should stay in line with the stepper, not crossing over the pedals. If it does, re‑anchor or adjust the angle of your hands.
6️⃣ Track your progress
Grab a notebook or a phone note and jot down three things after each session: cadence (steps per minute), band tension level, and how many reps you completed in each strength interval. After a week, you’ll see clear trends – maybe you can step a bit faster or add a heavier band.
Data from users of mini steppers shows a noticeable calorie boost when bands are added. Mini steppers can help you burn calories while you’re moving, making the combo a time‑efficient way to hit both cardio and strength goals.
7️⃣ Quick‑fix troubleshooting checklist
- Band slipping? Tighten the anchor loop or add a rubber band over the handle.
- Pedals wobble? Place a non‑slip mat underneath or tighten any loose screws.
- Shoulder strain from fast release? Slow the band’s return and keep elbows slightly bent.
With these steps in place, you’re ready to turn that tiny stepper into a full‑body workhorse. Set a timer, grab the band, and give yourself a 5‑minute “step‑and‑pull” burst after your next meeting. You’ll feel the cardio rush, the muscle pump, and the satisfaction of having a compact, effective workout right at home.
Effective Workout Routines Combining a Mini Stepper and Resistance Bands
So you’ve got the stepper set up and the bands hooked, but you’re wondering how to actually turn that combo into a workout that feels purposeful instead of just “step‑and‑wiggle.” Trust me, we’ve all been there – that moment when you stare at the pedals and think, “What now?” The good news is you can build a full‑body routine in five‑minute blocks that feels as natural as chatting with a friend over coffee.
1️⃣ The classic “step‑and‑pull” circuit
Start with a 30‑second warm‑up – just steady stepping, no bands. Then jump straight into a 30‑second strength burst while you keep the cadence going. Here’s a quick template you can copy‑paste into any timer app:
- 0‑30 sec: Warm‑up (step only)
- 30‑60 sec: Band chest press – push forward as you step
- 60‑90 sec: High‑row – pull the band toward your chest
- 90‑120 sec: Squat‑to‑press – squat on the step, then press overhead
- Repeat 2–3 rounds, finish with a 30‑second easy step.
This pattern keeps your heart rate up while you hit the upper‑body muscles that would otherwise sit idle. And because you’re never stopping the stepping motion, the cardio stays continuous – that’s why Nordic Lifting explains that pairing bands with a mini stepper can boost calorie burn without sacrificing joint‑friendliness.
2️⃣ Targeted band moves for specific goals
If you’re after a tighter core, swap the chest press for a standing band rotation. Hold the band with both hands, step, then rotate your torso as you pull the band across your chest. For glute activation, try a banded reverse lunge while stepping – place one foot on the pedal, step back into a lunge, and pull the band upward.
Need a quick upper‑body pump? Try a set of bicep curls between stepping intervals. The band’s tension works the same way a dumbbell would, but it stays anchored to the stepper, so you never have to juggle extra equipment.
3️⃣ Office‑friendly “micro‑burst”
Got a meeting that drags on? Slip the stepper under your desk, loop a light band around the handle, and do 10‑second intervals of high‑knee marching while you type. It feels almost like a secret dance, and you’ll notice your energy spike once the call ends.
Because the stepper is low‑impact, you won’t disturb coworkers – just a soft rhythm that keeps your legs warm and your mind focused. A mini stepper can sit in a corner of any workspace, making it easy to turn idle minutes into active minutes.
4️⃣ Progression checklist
Once the basic circuit feels easy, level up in two ways:
- Increase band tension – move from a light to a medium loop, then to a heavy one.
- Speed up the cadence – aim for 100–110 steps per minute, which feels like a brisk walk on an incline.
Track the number of reps you nail in each 30‑second strength burst. When you see a steady climb, you know the combo is working.
Looking for a ready‑made machine that already includes bands and an LCD monitor? Sunny Health’s mini stepper model bundles everything together, so you can focus on the workout, not the setup.
Finally, remember that consistency beats intensity for most people. Even a 5‑minute “step‑and‑pull” burst three times a day adds up to a solid cardio‑strength habit. So, what’s stopping you? Grab that band, set a timer, and give yourself a quick burst right after your next email. You’ll feel the pump, the cardio rush, and the tiny triumph of making the most of a piece of equipment that’s barely the size of a shoebox.
Maintenance Tips and Common Troubleshooting
Okay, you’ve got your mini stepper with resistance bands humming away and you’re starting to love those quick “step‑and‑pull” bursts. But like any good side‑kick, the gear needs a little TLC so it doesn’t quit on you mid‑rep.
Quick‑clean routine you can do between workouts
First thing’s first: wipe down the foot plates and handles after each session. A soft, lint‑free cloth dampened with a dab of mild soap works wonders. It removes sweat, keeps the grip from getting slippery, and prevents the rubber from degrading faster.
And here’s a tiny habit that feels almost lazy but actually saves you a lot of hassle later – give the band a quick shake before you store it. That loosens any clumped fibers and stops the loops from developing those odd “kinks” that can feel like a surprise snap‑back later on.
Lubricate the moving parts (but not the bands)
If your stepper uses a hydraulic mechanism, you might notice a faint squeak after a few weeks of steady use. A few sprays of silicone‑based lubricant on the pivot points usually does the trick. Just avoid getting any on the resistance bands; a slippery band defeats the whole purpose of controlled tension.
For magnetic‑resistance models, a dry cloth wipe is enough – there’s no moving oil to worry about. Still, give the magnet housing a once‑a‑month dust off so you don’t get any gritty debris interfering with the smooth glide.
Secure the band anchor point
One of the most common hiccups is the band slipping off the handle loop. Double‑check that the loop is fully closed and that the band sits snugly against the metal eye. If the handle feels a bit loose, wrap a small piece of athletic tape around the loop – it adds friction without messing up the aesthetics.
Sometimes the band can drift sideways during a high‑intensity row. If that happens, pause, readjust your hand position a few centimeters inward, and keep the line of pull parallel to your torso. It feels like a tiny tweak, but it saves your shoulders from an awkward stretch.
Wobble? Tighten it up.
A wobbling foot plate is a red flag. First, make sure the stepper is on a level surface – a piece of plywood or a non‑slip yoga mat can level out uneven floors. If the wobble persists, look for the little Allen‑key screws on the base. Tightening them just a quarter turn usually firms up the frame.
Don’t over‑tighten, though; you’ll hear a creak that means you’ve stripped the threads. A gentle, firm snug is all you need.
Band wear and tear – when to replace
Even the best latex bands have a lifespan. Look for signs like visible cracks, a loss of elasticity, or a “slap” sound when you stretch them quickly. If you notice any of those, retire the band and grab a fresh one. It’s a cheap insurance policy that keeps your joints safe.
Pro tip: keep a rotation of three bands (light, medium, heavy). When one starts to feel a bit “soft,” swap it out and let the fresh band do the heavy work. Your muscles will thank you for the consistent tension.
Battery or power check (if you have a motorized model)
Some mini steppers come with a small rechargeable battery or plug‑in power supply. If the display flickers or the motor sounds weaker, first check the plug connection – a loose cord is the simplest culprit.
If it’s battery‑powered, give the battery a full charge every few weeks, even if you haven’t used the stepper. Batteries love a regular charge cycle; otherwise, you’ll get a sudden “dead” notice right in the middle of a set.
Troubleshooting cheat sheet
- Band slipping? Re‑anchor, add tape, or use a thicker loop.
- Foot plate wobble? Level the floor, tighten base screws, add a non‑slip mat.
- Squeaky hydraulic? Apply silicone lubricant sparingly to pivot points.
- Motor stalls? Check power cord, recharge battery, ensure nothing is jammed under the pedals.
- Band feels loose? Replace with next tension level; rotate bands regularly.
Remember, a little preventive care after each 5‑minute burst can keep your mini stepper with resistance bands humming for months. It’s not rocket science – just a handful of simple habits that fit into the same five‑minute window you already spend working out.
So, next time you finish a “step‑and‑pull” set, take a breath, grab a cloth, give those quick fixes a spin, and you’ll be ready for the next round without missing a beat.
FAQ
What exactly is a mini stepper with resistance bands?
It’s a compact, low‑impact stepper that lets you attach elastic bands to the handles or foot plates. While you’re stepping, the bands add upper‑body pulling or pressing moves, turning a simple cardio machine into a full‑body trainer. Because the footprint is tiny, you can tuck it under a desk or in a closet and still get a real strength‑cardio combo.
Do I need a special stepper, or can I use any model?
Most standard mini steppers have a built‑in handle or eye that works as an anchor point. If your unit doesn’t, you can loop the band around a sturdy door frame or a piece of furniture – just test for wobble first. The key is a stable base and a secure loop so the band stays taut without snapping back.
How often should I change the resistance bands?
Latex bands typically last 6‑12 months with regular use. Keep an eye on visible cracks, a loss of stretch, or a “slap” sound when you pull. When any of those show up, swap it out for a fresh one. Rotating three bands (light, medium, heavy) lets you retire the softest first while the others keep the workout challenging.
Can I combine the stepper with rehab exercises?
Absolutely. Because the stepping motion is low‑impact, it’s gentle on knees and hips – perfect for physiotherapy. Add a light band and perform controlled rows or chest presses to engage the upper back without overloading the joints. Start with a slow cadence (80 steps per minute) and focus on smooth band tension; that way you get muscle activation without compromising joint safety.
What’s the best cadence for a cardio‑plus‑strength session?
Aim for 80‑100 steps per minute. That feels like a brisk walk on a flat surface and keeps your heart rate in the moderate zone. When you pause for a strength move (like a row or press), stay on the balls of your feet so you can jump right back into the stepping rhythm without losing momentum.
How do I keep the stepper quiet in an apartment?
Place a thin yoga mat or rubber shelf liner under the unit to absorb vibrations. Tighten any loose screws on the base – a wobble can amplify noise. If it’s a hydraulic model, a quick spray of silicone lubricant on the pivots will hush squeaks. With these tiny tweaks, neighbors will barely hear you stepping.
Is there a quick way to track my progress without fancy tech?
Grab a notebook or a phone note and jot down three things after each session: steps per minute, band tension level, and reps completed during each strength interval. Over a week you’ll spot trends – maybe you’ve moved from a light to a medium band or added five more rows per set. That simple log is enough to keep you motivated and see real improvement.
Conclusion
By now you’ve seen how a mini stepper with resistance bands can turn a tiny corner of your home into a full‑body gym.
It gives you cardio that’s kind to the knees, plus the upper‑body pull and press you’d normally need dumbbells for – all without tripping over a treadmill.
Remember the sweet spot: 80‑100 steps per minute, a light‑to‑medium band for the first few weeks, and a quick notebook note after each session. Those tiny habits add up, so you’ll notice stronger rows, tighter shoulders, and a higher heart‑rate after just a handful of workouts.
Got a noisy apartment? A yoga mat, a bit of silicone on the pivots, and tightened screws keep the stepper whisper‑quiet, letting you train any time without waking the neighbors.
So, what’s the next move? Grab your stepper, loop a band, set a timer for 12 minutes, and give yourself that “step‑and‑pull” burst right after your next coffee break. You’ll feel the cardio rush, the muscle pump, and the satisfaction of actually using the space you have.
Keep tracking, keep tweaking the band tension, and watch the progress stack up. Your mini stepper with resistance bands is ready to become a daily habit that fits your life, not the other way around.