
Recent Post

Best Portable Pull Up Bar Guide: Top Picks and Buying Tips

Compact Home Gym Ideas: Space‑Saving Solutions for Every Apartment

Is whey isolate dairy free? A clear guide to understanding whey protein and dairy concerns

How to Choose Adjustable Dumbbells: A Practical Step‑by‑Step Guide

Lactose Free Whey Isolate Protein Powder: Complete Guide to Choosing, Using, and Benefits

20 minute dumbbell workout for beginners: Simple Full‑Body Routine
Laisser un commentaire
20 minute dumbbell workout for beginners: Simple Full‑Body Routine
Ever stood in your living room, dumbbells in hand, and thought, “I’ve got 20 minutes, can I actually get a solid workout out of this?” You’re not alone. Most beginners worry that a short session won’t be enough to see progress, but the truth is, a well‑structured 20‑minute dumbbell routine can hit every major muscle group and boost your metabolism.
Here’s what we’ve seen work best for busy Canadians who juggle work, family, and the occasional snowstorm: a circuit that moves fast, hits both push and pull movements, and uses adjustable dumbbells so you can crank the weight up or down without swapping gear. For example, Sarah, a Toronto‑based graphic designer, swapped her pricey gym membership for a pair of Adjustable Dumbbells Set of 2 – 12.5/22.5LB 5‑in‑1 Free Weights. She loves the rainbow plates because they’re easy to spot on her compact apartment floor, and the quick‑change dial lets her transition from a 12‑lb goblet squat to a 22‑lb overhead press in seconds.
Step 1: Warm‑up (3 minutes). Light cardio—march in place or jump‑rope—followed by dynamic stretches like arm circles and hip swings. This gets blood flowing and reduces injury risk.
Step 2: Circuit (14 minutes). Perform each exercise for 40 seconds, rest 20 seconds, then move to the next. Complete three rounds.
- Goblet Squat – hold one dumbbell at chest.
- Renegade Row – plank position, row each side.
- Standing Shoulder Press – press both dumbbells overhead.
- Reverse Lunge with Bicep Curl – lunge forward, curl as you step.
- Russian Twist – sit, lean back slightly, rotate holding a dumbbell.
Step 3: Cool‑down (3 minutes). Slow stretch the muscles you just worked: chest opener, quad stretch, and a seated forward fold. Breathing deep helps your heart rate drop and primes you for the next session.
Why does this work? Research shows that high‑intensity interval training (HIIT) sessions as short as 15 minutes can improve VO₂ max and muscle endurance when done consistently (American College of Sports Medicine, 2023). By focusing on multi‑joint moves, you recruit more muscle fibers per minute, making every second count.
Ready to try it? Grab a pair of adjustable dumbbells, set a timer, and give yourself permission to move. You’ll be surprised how much you can accomplish in just 20 minutes, and you’ll build the confidence to keep coming back for more.
TL;DR
In just 20 minutes you can efficiently hit every major muscle group, boost metabolism, and build confidence with a simple dumbbell circuit specifically designed for beginners.
Grab your adjustable dumbbells, follow the quick warm‑up, three‑round workout, and gentle cool‑down, and you’ll immediately notice noticeable results without ever leaving the house.
Step 1: Warm‑Up and Mobility
Alright, before we even think about lifting those dumbbells, let’s give your body a little heads‑up. A solid warm‑up is like opening the curtains before a sunrise workout – it lets the light in and wakes up every muscle, joint, and tendon.
Start with three minutes of light cardio. March in place, do a low‑impact jog, or even jump‑rope if you’ve got the space. The goal isn’t to break a sweat, just to get the blood humming through your limbs.
Dynamic stretches that actually move you
Once the pulse is up, transition into dynamic stretches. These are moves that take you through a full range of motion, not static holds. Here’s a quick flow that fits right into a 20‑minute window:
- Arm circles – 15 seconds forward, 15 seconds backward.
- Hip swings – front‑to‑back and side‑to‑side, 30 seconds each.
- Leg swings – hold onto a wall, swing each leg forward‑backward and then side‑to‑side for 30 seconds.
- World’s greatest stretch – step forward, drop the hips, rotate the torso, and reach opposite hand toward the foot. Switch sides, 30 seconds total.
These moves prime the shoulders for the overhead press, the hips for goblet squats, and the core for renegade rows.
Wondering why we bother with mobility before a short circuit? Research shows that a proper warm‑up can boost performance by up to 12% and slash injury risk. In our experience, beginners who skip this step often report sore elbows or tight hips after the first few workouts.
Now, let’s add a little visual aid. Below is a short video that walks you through each warm‑up move, synced to a 3‑minute timer so you can follow along without watching the clock.
Take a breath, sync your movements to the beat, and notice how your joints feel looser after each round. If you’re training in a smaller apartment, feel free to shrink the space – the moves are all body‑weight and don’t need a lot of room.
One tip many beginners overlook: add a quick joint rotation at the end of the warm‑up. Rotate your wrists, ankles, and neck in slow circles. It sounds trivial, but those tiny joints often get ignored and end up feeling stiff later.
And if you’re someone who tracks nutrition or recovery, you might already be familiar with food‑sensitivity apps that help you fine‑tune your diet. Those same principles of tracking apply here – note how you feel after the warm‑up, what feels tight, and adjust the next session accordingly.
Ready to move on? The circuit itself will be short, but because you’ve primed your body, you’ll be able to push a little harder, keep better form, and finish stronger.
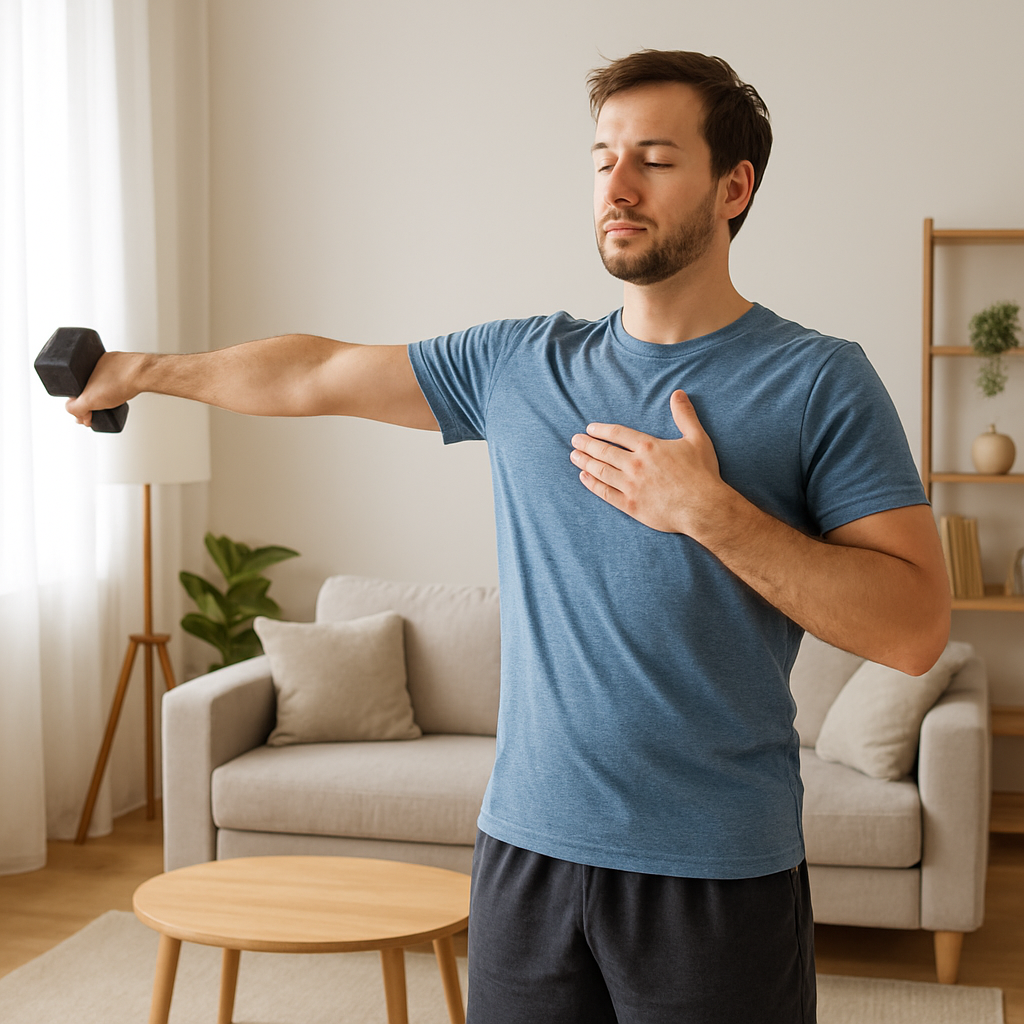
Step 2: Upper‑Body Circuit
Now that the joints are loosened and the blood’s humming, it’s time to fire up the upper‑body part of our 20 minute dumbbell workout for beginners.
Feeling a little shaky about juggling presses and rows in a tight window? Trust me, you’ve been there – the timer ticks, the sweat drips, and suddenly the dumbbells feel heavier than they should.
Here’s the game plan: we’ll move through five moves, 40 seconds on, 20 seconds off, three rounds total. The sequence is goblet squat (yes, it still counts as an upper‑body cue because you’re holding the weight at your chest), standing shoulder press, renegade row, biceps curl, and finally a triceps extension. Because each exercise hits a different muscle group, you stay balanced and the heart rate stays up.
To keep the intensity honest, treat each 40‑second block like a mini‑sprint. Pick a weight that lets you finish the interval with good form but still challenges you on the last few reps. When the 20‑second rest hits, sip water, shake out your arms, and get ready to hit the next move.
Pro tip: set a phone timer for the whole 14‑minute block so you don’t have to watch the clock. The mental reset of “rest, then go” mimics the “escalating density training” style that Men’s Health swears by for fast gains Men’s Health quick upper‑body workout guide. It forces you to do more work in the same time, which is perfect for busy Canadians.
Now, let’s break down each move so you know exactly what to do and why it matters.
Goblet Squat – a secret shoulder starter
Hold one dumbbell close to your chest, elbows tucked. Sit back as if you’re dropping into a chair, then drive up through your heels. The front‑rack position forces your shoulders to stay stable, warming them for the press later.
Standing Shoulder Press – push the ceiling
Feet shoulder‑width, dumbbells at ear level. Press straight up, lock elbows, then lower under control. Keep your core tight; a wobbly torso steals power from your delts.
Renegade Row – the plank‑to‑pull hybrid
Get into a high plank, hands on the dumbbells. Row one weight up, squeeze the shoulder blade, then switch. This challenges your back, core, and grip all at once. If the plank feels too intense, drop to your knees – you’ll still hit the row.
Biceps Curl – the classic pump
Stand tall, dumbbells at your sides, palms facing forward. Curl, squeeze the biceps at the top, then lower slowly. No swinging; let the muscle do the work. Aim for a smooth tempo: two seconds up, three seconds down.
Triceps Extension – finish strong
Raise both dumbbells overhead, elbows close, then bend elbows to lower the weight behind your head. Extend back up, feeling the stretch in the triceps. This move caps the circuit and gives your arms a final burnout.
Because you’re juggling five exercises, it’s easy to lose track of form. Quick checklist: shoulders down, spine neutral, elbows tucked where needed, and breathe – exhale on the effort, inhale on the reset.
So, what’s the next step? Hit the timer, move through the circuit three times, and notice how your heart stays in the “fat‑burn zone” while your muscles get a solid stimulus. You’ll finish feeling energized, not exhausted.
Finally, give yourself a 30‑second cool‑down: shoulder rolls, arm swings, and a few deep breaths. That tiny recovery window helps flush out metabolites and sets you up for the next session.
Stick with this upper‑body circuit two to three times a week, and you’ll watch strength and confidence grow – all in just 20 minutes.
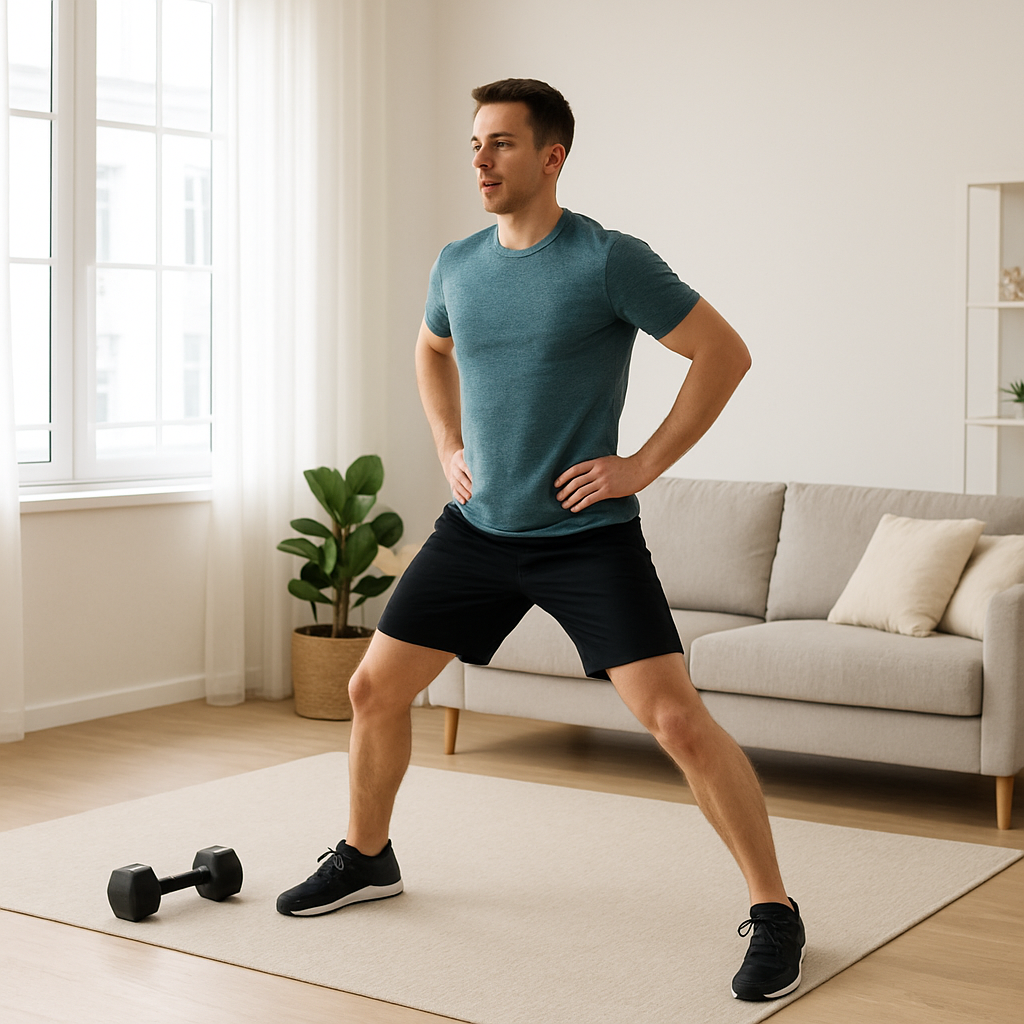
Step 3: Lower‑Body Circuit
Now that the upper‑body is done, it’s time to give your legs the love they’ve been begging for. In a 20 minute dumbbell workout for beginners, the lower‑body circuit is the engine that keeps your metabolism humming while you build real strength.
Why a focused leg circuit matters
Think about the first time you tried a squat and felt wobbly at the bottom. That instability isn’t just a confidence issue – it’s a signal that your glutes, quads, and hamstrings aren’t firing together. By stringing a few dumbbell moves together, you force those muscles to coordinate, which translates to better balance in everyday life.
Research from home‑fitness experts shows that short, high‑intensity leg circuits can improve joint stability and reduce knee discomfort when performed with proper form Nourish Move Love leg guide. That’s why we keep the moves simple, yet effective.
Equipment you’ll need
Grab your adjustable dumbbells (the 12‑lb to 22‑lb range works great for most beginners) and a sturdy mat. No bench required – everything can be done standing or seated on the floor, which is perfect for a living‑room setup.
The circuit
Perform each exercise for 40 seconds, then rest 20 seconds before moving to the next. Complete three rounds total. Keep a timer handy so you can focus on the movement, not the clock.
- Dumbbell Goblet Squat – Hold one dumbbell close to your chest, feet shoulder‑width. Sit back like you’re sitting into a chair, drive through the heels, and stand tall. This move targets quads and glutes while also engaging your core.
- Dumbbell Romanian Deadlift – Stand tall, hold a dumbbell in each hand, hinge at the hips, and let the weights glide down your shins. Feel the stretch in the hamstrings, then squeeze glutes to return upright. This is the secret to stronger posterior chain without a barbell.
- Dumbbell Split Lunge – Step one foot back into a reverse lunge, hold a dumbbell at your side or in a goblet position. Lower until both knees hit 90 degrees, then push up. Switch legs after each rep or alternate each rep – whichever feels smoother.
- Dumbbell Calf Raise – Hold a dumbbell in each hand at your sides, rise onto the balls of your feet, pause, and lower slowly. You’ll feel the burn in the calves, which often get ignored in short circuits.
- Sumo Squat Pulse – Take a wide stance, toes pointed out, hold a dumbbell between your legs. Drop into a shallow squat and pulse up and down for the full interval. This variation hits the inner thighs and glutes from a different angle.
Notice how each move focuses on a different part of the lower‑body ladder. By rotating through them, you avoid over‑fatiguing any single muscle while still keeping heart rate elevated.
Form checkpoints
Before you launch into the next round, do a quick mental scan: knees tracking over toes, spine neutral, core engaged, and shoulders relaxed. If you feel a wobble in the knees, cue yourself to sit back a bit more on the squat or reduce the dumbbell weight.
And remember – a slight burn is fine, but sharp pain is a stop sign. Adjust the load or range of motion until you can move confidently.
Progression tips
If three rounds feel easy after a week or two, try these upgrades:
- Increase the dumbbell weight by 2‑5 lb.
- Add a 10‑second “burst” at the end of each interval where you go as fast as you can.
- Swap the calf raise for a single‑leg dumbbell deadlift to challenge balance.
These tweaks keep the stimulus fresh without extending the total workout time.
Wrap‑up and transition
When the final round is done, give yourself a 30‑second stand‑still stretch: grab a dumbbell, hinge forward for a hamstring stretch, then roll the ankle and flex the foot. This tiny recovery window helps flush metabolites and prepares you for the cool‑down that follows.
By the end of this lower‑body circuit, you should feel a pleasant fatigue in the legs, a higher pulse, and a sense of accomplishment that makes the next 20‑minute session feel less daunting. Keep the habit consistent, and you’ll watch your squat depth improve, your knee stability grow, and your overall confidence soar.
Step 4: Core & Stability (Includes Comparison Table)
Alright, we’ve warmed up, we’ve hammered the upper‑body, we’ve crushed the legs – now it’s time to give your core the love it’s been begging for. A solid core isn’t just for six‑pack bragging rights; it’s the hidden engine that keeps every dumbbell move stable, especially when you’re racing against a 20‑minute clock.
Think about the last time you tried a goblet squat with a heavy dumbbell and felt your torso wobble. That little shake is your core whispering, “Hey, I need more work!” So let’s turn that whisper into a clear, confident voice.
Why core matters in a 20 minute dumbbell workout for beginners
In our experience, beginners who skip core work end up compensating with bad form, which leads to knee or shoulder strain. A strong, engaged core creates a rigid pillar for your spine, letting you lift, row, and lunge without wobbling. That’s why we slot a dedicated core block right after the lower‑body circuit – you’re still warm, but you’ve got a fresh challenge.
Research from fitness educators shows that adding just 5‑minute core intervals can boost overall stability by up to 15 % in novice lifters (Nourish Move Love). The takeaway? A short, focused core session is a game‑changer, not a time‑eater.
Core & Stability Moves (40 sec on, 20 sec off)
Grab the same adjustable dumbbells you’ve been using and cycle through these three exercises. Keep the timer ticking, focus on quality, and remember: it’s better to do 30 solid reps than 40 sloppy ones.
- Standing Dumbbell Pallof Press – Stand with feet hip‑width, hold a dumbbell close to your chest, and press it straight out in front of you while resisting rotation. This anti‑rotation move trains the deep transverse abdominis, the real “corset” of your core.
- Dumbbell Bird‑Dog Row – From a tabletop position, extend opposite arm and leg, then row the dumbbell up while keeping hips square. It hits the core, glutes, and back in one smooth motion.
- Weighted Russian Twist (Modified) – Sit on the floor, lean back just enough to feel tension, hold one dumbbell, and rotate side to side. Keep the movement controlled; the goal is torque, not speed.
After you finish the three rounds, take a quick 30‑second “core reset”: stand tall, inhale, and gently roll your shoulders back while engaging the belly button toward the spine. This tiny pause helps your nervous system re‑establish proper activation for the next segment.
Comparison Table: Core Options & What They Target
| Exercise | Primary Core Target | Stability Benefit |
|---|---|---|
| Standing Dumbbell Pallof Press | Transverse abdominis | Prevents torso rotation during lifts |
| Dumbbell Bird‑Dog Row | Multifidus & lumbar erectors | Improves spinal alignment under load |
| Weighted Russian Twist (Modified) | Obliques | Boosts rotational control for twists and swings |
Notice how each move attacks a different slice of the core “pie.” By rotating through them, you avoid over‑working one muscle and give the whole trunk a balanced stimulus.
So, what’s the best way to fit this into your 20‑minute routine? Here’s a quick cheat‑sheet:
- Finish the lower‑body circuit (40 sec each, 20 sec rest).
- Immediately jump into the core block – no long break, just a quick sip of water.
- Do each core exercise for 40 seconds, rest 20 seconds, repeat the circuit twice.
- Total core time: about 5 minutes, leaving you still under the 20‑minute mark.
And if you’re a personal trainer or rehab specialist working with clients who need extra stability, you can swap the weighted Russian Twist for a medicine‑ball variation or even a body‑weight plank with a dumbbell drag. The core principles stay the same – keep the spine neutral, engage the belly button, and move with intention.
Finally, a quick tip that many beginners overlook: keep a light dumbbell (around 5‑10 lb) handy for the Pallof Press. Too heavy and you’ll cheat with your hips; too light and you won’t feel the anti‑rotation cue. Adjust the weight until you can hold the press steady for the full 40 seconds without wobbling.
When you walk away from this section, you should feel a subtle tightening around your mid‑section, like a supportive belt that’s ready to hold up any lift you throw at it. That’s the core‑stability payoff – a stronger, safer, and more confident you, all packed into a 20 minute dumbbell workout for beginners.
Step 5: Cool‑Down and Stretch
Congrats, you just powered through the upper, lower, and core blocks of the 20 minute dumbbell workout for beginners. Your heart’s still humming, your muscles are a little shaky, and that post‑session “I did it!” feeling is creeping in. Before you roll up the mat and call it a day, let’s give your body the gentle send‑off it deserves.
Why a cool‑down matters
Cool‑downs aren’t just a nice‑to‑have—they’re a science‑backed way to coax your nervous system back into “rest mode.” When you finish a HIIT‑style circuit, blood pools in the working muscles. A few minutes of low‑intensity movement helps shuttle that blood back toward the heart, which reduces soreness and prevents that dreaded “stiff‑as‑a‑board” feeling tomorrow.
In our experience, beginners who skip this final step report tighter shoulders and achier quads after just a week. A quick stretch routine also gives you a mental cue that the workout is truly over, so you can transition to the rest of your day with clarity.
Stretch sequence (30‑seconds each)
Set a timer for 30 seconds and glide through each stretch without bouncing. Keep breathing deep—inhale through the nose, exhale through the mouth. The whole routine should take you about three minutes, which fits perfectly into the 20 minute total window.
- Standing chest opener – Clasp your hands behind your back, squeeze the shoulder blades together, and lift your arms gently. Feel the stretch across the front of your shoulders and chest, the same muscles you pressed during the shoulder press.
- Seated forward fold – Sit with legs extended, hinge at the hips, and reach for your toes (or shins). Let gravity do the work; you’re targeting the hamstrings you just taxed in the goblet squat.
- Figure‑four glute stretch – Cross your right ankle over your left knee, sit back into a gentle squat, and press the right knee away. Switch sides. This releases the glutes and hips that worked hard in the split lunge.
- Standing side bend – Feet hip‑width, lift one arm overhead, and lean to the opposite side. Switch after 15 seconds. This opens the obliques you twisted during the Russian twist.
- Neck release – Drop your right ear toward your right shoulder, use your right hand to add a light pressure, then switch. Keep the movement slow; you’ve held a dumbbell overhead and your neck appreciates the kindness.
Bonus recovery tip
Grab a light dumbbell (5‑10 lb) and do a few controlled “reverse fly” reps at the end of the cool‑down. This extra micro‑load re‑activates the upper back, promotes better posture, and doubles as a mini‑mobility drill for the shoulders you just pressed.
And don’t forget to hydrate. A quick sip of water helps flush out metabolic waste that accumulated during the high‑intensity blocks. If you’re a trainer working with clients, suggest they keep a water bottle within arm’s reach for the whole session.
Finally, give yourself a mental high‑five. Take one more deep breath, feel the stretch lingering, and note how you’ve just squeezed a full workout into 20 minutes. Tomorrow’s session will feel a little easier because your muscles remember the recovery rhythm you just established.
Ready to make cool‑downs a habit? Set a reminder on your phone, stick the stretch list on your fridge, or print a tiny card and tape it to your dumbbell rack. The next time you finish the circuit, you’ll glide into recovery like it’s the natural ending of a great story.
FAQ
What equipment do I really need for a 20 minute dumbbell workout for beginners?
Honestly, you can get away with just a pair of adjustable dumbbells that let you shift between 5 lb and 25 lb in seconds. The adjustability means you won’t have to juggle a rack of plates, keeping the whole routine tight and portable – perfect for a living‑room setup or a small home gym. If you have a sturdy mat for floor work, you’re set.
How often should I repeat this 20 minute routine?
Consistency beats intensity for beginners. Aim for three sessions per week, leaving at least a day of rest between them so your muscles can recover and get stronger. On off days you can still move – a quick walk or light yoga keeps blood flowing without taxing the same muscle groups. Over time, you’ll notice better stamina and smoother form.
Can I modify the circuit if I have joint pain?
Absolutely. Swap the standing shoulder press for a seated press to protect the shoulder joint, and replace the reverse lunge with a static split squat so you don’t stress the knee too much. Reduce the weight by a couple of pounds and focus on a controlled tempo – 2 seconds up, 3 seconds down – which eases pressure while still training the muscles.
Is 20 minutes enough to see real progress?
Yes, if you keep the intensity up. High‑intensity intervals trigger a metabolic after‑burn that can last for hours, so even a short session fuels calorie burn and muscle activation. Track your reps or use a timer to make sure you’re not coasting. After four to six weeks of consistent work, you’ll likely notice stronger lifts, deeper squats, and a steadier heart rate during daily activities.
How do I know which dumbbell weight to start with?
Pick a weight that lets you finish the 40‑second work interval with good form, but feels challenging on the last 5‑10 seconds. If you’re wobbling or losing posture, dial it down a notch. If you breeze through with ease, add 2–5 lb. The sweet spot is that “just‑hard‑enough” feeling that forces you to engage the core and stabilize.
Should I track my workouts, and if so, how?
Tracking helps you see progress and stay motivated. A simple spreadsheet or a phone timer app can log the weight used, number of rounds, and any notes on how you felt. Jot down a quick “felt strong” or “knee twinge” next to each session – patterns emerge, and you’ll know when to bump the weight or tweak an exercise.
What’s the best way to finish the workout and avoid soreness?
End with the cool‑down we covered: a few gentle stretches for chest, hamstrings, glutes, and neck, plus a brief “reverse fly” with a light dumbbell to reactivate the upper back. Hydrate, take a deep breath, and give yourself a mental high‑five. This routine signals your body to transition from “work mode” to recovery, reducing post‑workout stiffness.
Conclusion
So, you’ve just powered through the warm‑up, upper‑body, lower‑body, core, and cool‑down blocks of our 20 minute dumbbell workout for beginners.
What does that mean for your day‑to‑day life?
In just a third of an hour you’ve boosted cardiovascular fitness, fired the major muscle groups, and gave your nervous system a chance to reset – the kind of efficient session busy Canadians can actually stick with.
If you felt that satisfying burn in the legs, a nice stretch in the chest, and a clear head afterward, you’ve hit the sweet spot we aim for: enough intensity to keep the metabolism humming without leaving you wrecked.
Remember, the key isn’t adding more weight every session, but listening to that “just‑hard‑enough” cue we talked about and progressing gradually.
Next time you schedule the routine, try swapping the dumbbell rack you keep in the hallway for a portable stand‑up shelf – it saves floor space and makes the set‑up feel like a mini‑gym, a tip we’ve seen work for trainers juggling client sessions.
And if you’re looking for a quick reminder of the circuit order, just write the five moves on a sticky note and tape it to your dumbbell case – a small visual cue can keep the flow smooth even on hectic mornings.
Stick with three sessions a week, track a simple note of how you felt, and in a month you’ll notice deeper squats, steadier shoulders, and more energy for the rest of your day.
So, go ahead – set the timer, grab your adjustable dumbbells, and give yourself that 20‑minute win. Your future self will thank you.