
Recent Post

Best Portable Pull Up Bar Guide: Top Picks and Buying Tips

Compact Home Gym Ideas: Space‑Saving Solutions for Every Apartment

Is whey isolate dairy free? A clear guide to understanding whey protein and dairy concerns

How to Choose Adjustable Dumbbells: A Practical Step‑by‑Step Guide

Lactose Free Whey Isolate Protein Powder: Complete Guide to Choosing, Using, and Benefits

20 minute dumbbell workout for beginners: Simple Full‑Body Routine
Laisser un commentaire

How to use resistance bands with door anchor: Step-by-Step Home Workout Guide
Ever walked into your living room, eyes on the door, and thought, “I could actually get a solid workout without a gym?”
You’re not alone – many of us crave that portable, low‑cost strength solution, especially when space is tight or the weather is lousy.
That’s where the door anchor steps in, turning an ordinary doorway into a sturdy anchor point for your resistance bands.
But before you start looping bands over the frame, you’ll want to know the safest, most effective way to set it up so nothing snaps or slides.
First, check that your door is solid – a solid wood or metal door with a tight frame is ideal; flimsy hollow‑core doors just won’t cut it.
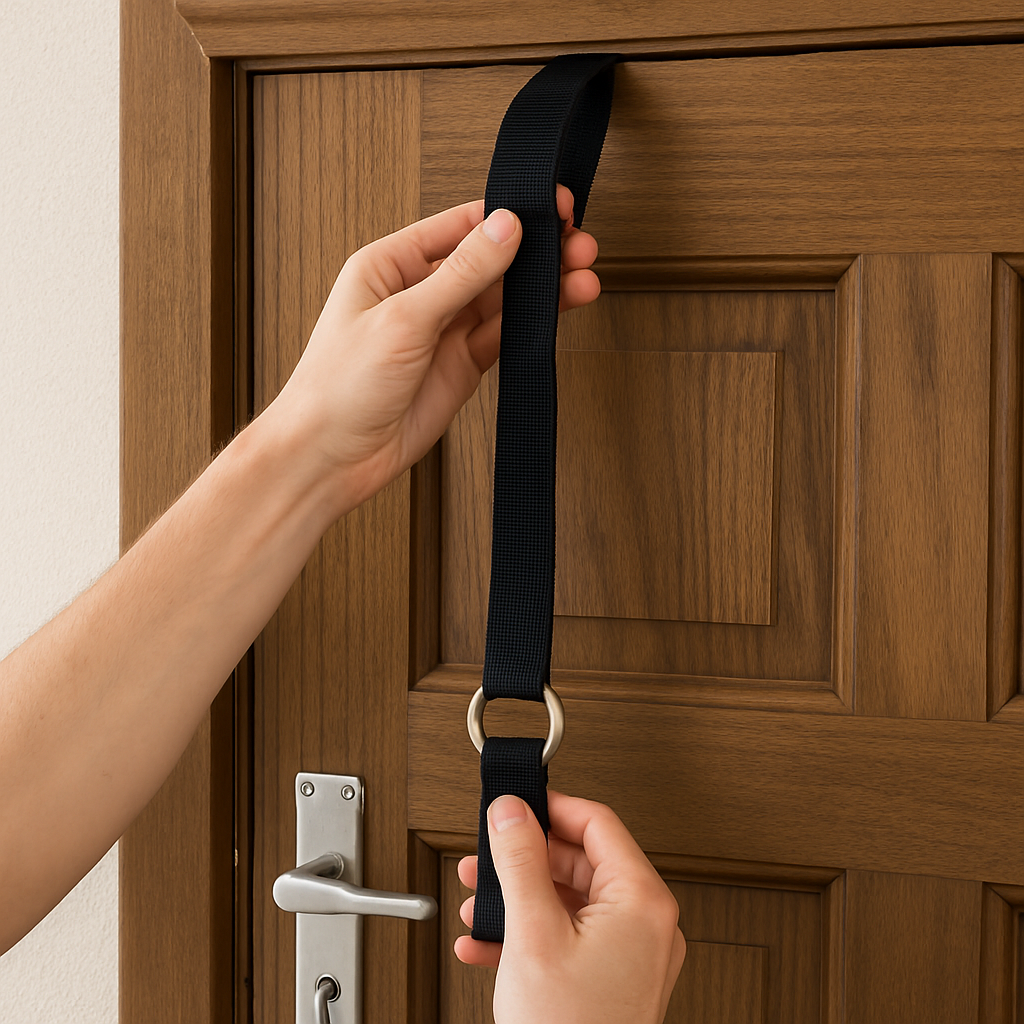
Next, open the door just a crack – about an inch – so the anchor can hook onto the top jamb without the door closing on it.
Slide the anchor’s strap over the door, pull it tight, and lock the built‑in latch; you should feel a firm grip before you even touch the band.
Now attach your resistance band to the anchor’s loop or D‑ring – whichever fits the band’s thickness – and give it a gentle pull to test stability.
If the anchor wiggles, tighten the strap a bit more; if it still moves, try a different door or a heavier‑duty anchor.
Once it feels rock‑solid, you’re ready for a range of moves – from bicep curls and shoulder presses to leg extensions and glute bridges.
Because the anchor stays put, you can focus on form instead of worrying about the band slipping off a flimsy hook.
And if you’re training a client or a rehab patient, the door anchor lets you quickly adjust tension without swapping equipment – a real time‑saver.
So, what’s the bottom line? Mastering how to use resistance bands with a door anchor gives you a versatile, low‑cost strength tool that fits in a backpack.
Ready to give it a go? Grab your favorite bands, find a sturdy door, set up the anchor, and watch how quickly your home workouts level up.
TL;DR
Using a door anchor turns any sturdy doorway into a reliable resistance‑band station, letting you safely perform curls, presses, and leg work without bulky equipment.
Set it up in seconds, test the grip, and enjoy versatile, low‑cost strength training at home or in the clinic, boosting results for you instantly.
Step 1: Choose the Right Door Anchor
Alright, let’s talk about the very first decision you’ll make when you’re turning a doorway into a mini‑gym: picking the right door anchor. It sounds simple, but the right piece of gear can be the difference between a smooth, safe workout and a shaky, frustrating one.
First thing’s first – think about the material of your door. Solid wood, metal, or a heavy‑duty composite frame are your best friends. Hollow‑core doors are like a house of cards; they’ll give way under tension and ruin the whole set‑up. If you’re not sure, give the door a gentle push. Does it feel solid, or does it wobble? That little test tells you a lot.
Now, look at the anchor itself. The ideal anchor offers multiple attachment points (loops and D‑rings) so you can swap bands of different thicknesses without fumbling. It should have a sturdy, non‑slip strap that wraps around the door jamb and a latch that locks in place. One product that checks all those boxes is the Strength Training Essentials collection, which includes a robust door anchor designed for Canadian homes.
Here’s a quick checklist you can print out and keep on your fridge:
- Door material: solid wood, metal, or composite – no hollow core.
- Anchor strap width: at least 2 inches for a firm grip.
- Number of loops/D‑rings: 5+ gives flexibility.
- Latch mechanism: should click firmly and stay locked.
Does that sound like a lot? It’s actually just a handful of things you can verify in under a minute.
Let’s run through a real‑world scenario. Imagine you’re a personal trainer working in a client’s apartment. The client’s door is a solid oak entry door, and you have a set of Thera‑Band loops ranging from 10 lb to 60 lb. You pull out the anchor, loop the strap over the top jamb, and snap the latch. Because the anchor has both nylon loops and metal D‑rings, you can attach a 30‑lb band to a loop for bicep curls, then switch to a metal D‑ring for a chest press without changing the anchor.
Another example: you’re a physiotherapist rehabbing a knee injury. You need a low‑impact exercise that still challenges the quadriceps. You choose a door anchor with a wide, padded strap to protect the door frame, attach a light resistance band, and perform seated leg extensions. The anchor stays put because the padded strap distributes the force evenly across the jamb.
Pro tip from the pros: always test the anchor before you start the main set. Pull the band gently in opposite directions – if you feel any give in the strap or the latch, tighten the strap a quarter turn and test again. A solid test takes less than 30 seconds and saves you from a mid‑set surprise.
And here’s a little secret most beginners miss – the angle of the door matters. When the door is fully closed, the anchor sits flush against the jamb, giving maximum stability. If you open the door even a few centimeters, the anchor can shift. So, leave the door ajar just enough (about an inch) for the strap to slip over, then let the latch pull the door back toward the closed position.
What about safety? Think of the anchor like a car’s seatbelt – it’s only effective if you inspect it regularly. Look for frayed straps, worn stitching, or cracked metal rings. Replace any component that shows wear. It’s a small cost compared to the risk of a snapped band.
If you’re still on the fence about which anchor to buy, consider the warranty and return policy. A good manufacturer will stand behind the product for at least a year and offer a hassle‑free return if it doesn’t fit your door. That confidence usually means they’ve tested the design extensively.
One more thing – don’t forget the little details that make the setup feel professional. A rubber pad on the strap’s underside prevents scratching, and a quick‑release latch lets you pack up in seconds when you need to move the anchor to another room or take it on the road.
Just like you’d follow a step‑by‑step guide after a burst pipe, having a clear checklist for your door anchor ensures you never miss a step. If you ever need a concrete example of a thorough step‑by‑step process, check out this guide on What to Do After a Burst Pipe in the House: A Step‑by‑Step Guide. The mindset is the same – preparation beats panic.
So, to sum it up: choose a solid door, pick an anchor with multiple loops and a reliable latch, test it, and keep an eye on wear. Once you’ve nailed this first step, the rest of your resistance‑band routine will flow like a conversation over coffee.
Step 2: Secure the Anchor Properly
Alright, you’ve found a solid door and you’ve got the anchor in your hands – now the real magic happens when you lock that strap down so it won’t budge mid‑rep.
First, open the door just enough (about an inch) so the strap can slide over the top jamb. It sounds silly, but leaving the door fully closed can trap the strap and make it hard to get a clean pull later.
Next, pull the strap tight. You want the fabric to sit flush against the wood or metal without any slack. A good rule of thumb is to feel at least a firm “pinch” when you run your fingers along the edge – that’s the point where the strap is gripping the frame rather than just hanging.
Now comes the latch. Click it into place and give it a little tug. If the latch clicks and stays, you’ve got a solid lock. If it feels loose, rotate the strap another quarter turn and re‑click. The latch should resist opening even when you pull the band hard.
Here’s a quick sanity check: grab the resistance band, attach it to any loop, and pull in opposite directions. You should feel the anchor hold steady, not shift or creak. If you hear any movement, tighten the strap a bit more – you’re aiming for zero play.
Imagine you’re a personal trainer in a cramped studio. You’ve just set up the anchor on a sturdy oak door, looped a 30‑lb band for rows, and your client is ready. You give the band a gentle pull, feel the anchor stay put, and then you can focus on coaching form instead of worrying about the anchor slipping. That confidence is what separates a smooth session from a frantic scramble.
Now picture a physiotherapist working with a patient recovering from a knee injury. The therapist needs a low‑impact leg extension, so they attach a light band to the bottom loop of the anchor. Because the strap is wrapped tightly and the latch is fully engaged, the patient can perform the movement safely, and the therapist can adjust resistance on the fly without re‑installing anything.
Quick‑Check Checklist
- Door opened ~1 in, strap over top jamb.
- Strap pulled tight enough to feel a firm pinch.
- Latch clicked and resisted a firm pull.
- Band tested in both directions – no wiggle.
- Any slack? Rotate strap another ¼ turn.
What if the anchor still wiggles after you’ve tightened it? Try moving the anchor a few centimeters up or down the frame. Sometimes the wood grain or metal stud offers a stronger bite a little higher or lower. If it still shifts, the door itself may be the weak link – switch to a heavier‑duty anchor or a different door.
Maintenance is easy but often ignored. After every workout, give the strap a quick visual scan: look for frayed edges, worn stitching, or cracked metal loops. A tiny nick can become a failure point under load. Replace any compromised part before your next session – the cost of a new strap is pennies compared to a snapped band or a bruised shoulder.
Pro tip: slip a thin rubber pad or a folded towel between the strap and the door frame. It spreads the pressure, protects paint, and adds a tiny bit of friction that can make the anchor feel even more secure.
Finally, make securing the anchor a habit, not a one‑off. Treat it like you would fasten a seatbelt – you check it before every drive. A few seconds of tightening and testing now saves you from an embarrassing mid‑set surprise later.
Ready to lock it in? Grab that strap, follow the steps, and you’ll have a rock‑solid anchor that lets you attack rows, presses, curls, and leg work with confidence.
Step 3: Attach the Resistance Band Correctly
Now that your anchor is snug, the next move is getting the band onto it without a hitch. It sounds simple, but a sloppy attachment can turn a smooth set into a wobble‑and‑snap nightmare.
1. Choose the right loop or D‑ring
Most anchors give you a mix of nylon loops and metal D‑rings. Pick the one that matches your band’s thickness – a thin loop for light bands, a sturdy D‑ring for the heavier ones. If you’re not sure, run your fingers through the band; you should feel a little give when it slides into the loop, but no excessive slack.
2. Hook the band – step by step
Step a: Hold the band by the handles (or the middle if it’s a loop). Pull the end you plan to attach toward the anchor.
Step b: Slide the band’s hook through the chosen loop or over the D‑ring. Give it a firm tug to make sure the hook sits flush against the metal – you don’t want the band to slip off mid‑rep.
Step c: Double‑check the connection by pulling the band in the opposite direction. If the anchor stays put and the band doesn’t wobble, you’re golden.
Does that feel a bit much? Think of it like fastening a seatbelt. You wouldn’t just click the latch and drive off without a quick tug to make sure it’s locked, right?
3. Test the tension before you train
Grab the band with both hands and perform a gentle “test pull.” Aim for about 10‑15 % of the band’s rated tension – just enough to feel resistance without stressing the anchor. If you hear any creak from the door frame or notice the strap shifting, tighten the anchor strap another quarter turn and repeat the test.
In a recent guide, LIT Method stresses that a quick safety check prevents mid‑set surprises. That extra 30 seconds saves you from a potential injury.
4. Real‑world examples
Imagine you’re a personal trainer running a 20‑minute circuit for a client who wants to work on upper‑body strength. You attach a 40‑lb band to the top D‑ring for standing chest presses. After the test pull, the anchor holds firm, and the client can push through three sets without any wobble. The confidence you both feel lets you focus on form rather than equipment anxiety.
Or picture a physiotherapist guiding a patient through seated leg extensions. The therapist uses a light resistance band looped around the bottom anchor. Because the band is snug on a nylon loop, the patient can safely extend the knee without the band slipping off, making the rehab session smoother and more productive.
Need a visual refresher? Check out this quick demo:
Notice how the instructor pulls the band through the D‑ring, gives it a firm tug, and then steps back to test the anchor. That’s the exact rhythm you want to copy.
5. Pro tips to lock it down
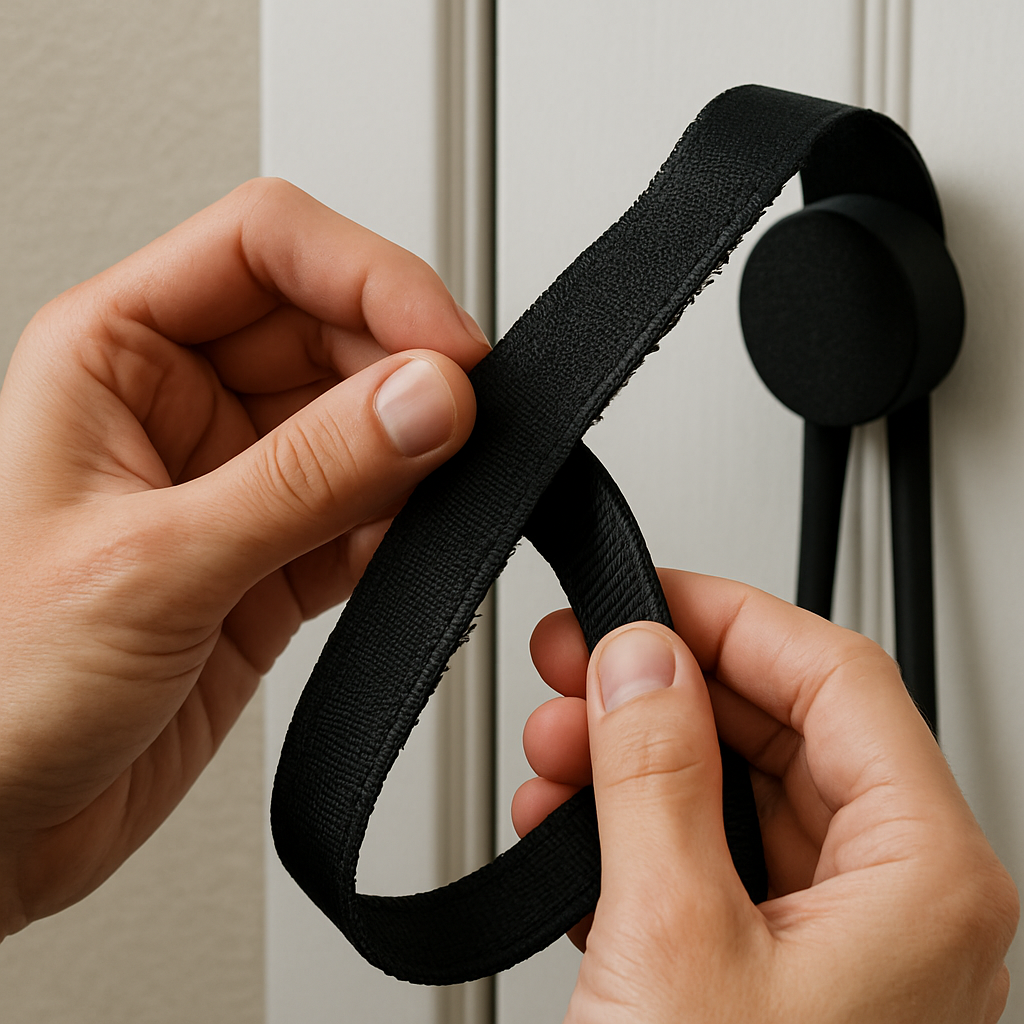
- Rotate the strap a full 360° after the first test – the extra twist distributes load evenly.
- Place a thin rubber pad between the strap and the door jamb if the surface is glossy; it adds friction and protects paint.
- For bands with handles, loop the handle through the D‑ring first, then slide the band’s hook; this prevents the handle from catching on the strap.
- Mark your favorite attachment point with a small piece of tape so you can replicate the setup session after session.
And remember, consistency is key. FitBeast’s complete guide recommends making the safety test a habit before every workout. A quick visual scan and a test pull keep the anchor reliable, day in and day out.
When the band is securely attached, you’re ready to move on to the actual exercises – rows, presses, curls, lunges – without worrying about a slip‑away surprise. So take a minute, follow these steps, and treat the attachment like you would a tight‑fit puzzle piece: it belongs exactly where it clicks.
Step 4: Perform Common Exercises Safely
Now that your anchor is locked in and the band is attached, it’s time to actually move. Think of this as the “play” part after you’ve set the stage – if you skip the safety rehearsal, the performance can end in a slip.
Check your stance before every set
Place your feet shoulder‑width apart, knees slightly bent, and keep a micro‑hinge in the hips. This base gives the anchor something to push against rather than you wobbling like a bobblehead.
Do you ever feel the band pulling you off balance? That’s a cue to widen your stance or step a few inches back – you’ll feel the tension in the muscle, not in your ankle.
Row – pulling the band toward you
Grab the handles, sit or stand with the anchor at chest height, and pull elbows straight back. Keep your shoulders down, away from your ears; that prevents the dreaded “shrug” that can stress the shoulder joint.
Tip: start with 10‑15 % of the band’s max resistance and add a 2‑second pause at the peak contraction. If the anchor shudders, tighten the strap a quarter turn and try again.
Chest press – pushing away from the anchor
Stand facing away from the door, one foot slightly forward for balance, and press the band forward until your arms are straight. Imagine you’re pushing a stubborn door open – the force comes from your chest, not your wrists.
Feel a gentle wobble? That means the anchor isn’t bearing the load evenly. Rotate the strap a full 360° (as we mentioned earlier) to spread the pressure across the jamb.
Squat or lunge – lower‑body work
Loop the band around the bottom D‑ring, step inside the loop, and perform a squat or reverse lunge. Keep your torso upright; the band should pull you slightly forward, encouraging a deeper squat without collapsing forward.
Because the anchor is above you, the band’s line of pull stays close to your hips, reducing stress on the lower back. If you hear any creak from the door frame, pause – that’s your body saying “check the anchor.”
Core‑engaged moves
Try a standing wood‑chop: attach the band high, pull diagonally down across your body while rotating the torso. Engage your abs like you’re bracing for a punch.
Remember to exhale on the pull and inhale on the return – breathing the right way keeps the intra‑abdominal pressure steady, which in turn stabilizes the anchor.
Safety checklist for every exercise
Before you start, run through these three quick questions:
- Is the anchor still tight after the last set?
- Is the band free of cracks or fraying?
- Am I using a resistance level that lets me keep control throughout the rep?
Answer “yes” to all, and you’re good to go. If you’re unsure, drop the tension and re‑test – a few seconds now beats a dropped band later.
Quick‑reference table
| Exercise | Anchor Position | Key Safety Tip |
|---|---|---|
| Row | Chest‑height D‑ring | Keep shoulders down; pause at peak |
| Chest Press | Top‑door D‑ring | Rotate strap 360° for even load |
| Squat / Lunge | Bottom D‑ring | Maintain upright torso; check for frame creak |
And that’s it – a handful of moves that cover the upper, lower, and core sections, all performed safely with your door anchor. Keep the checklist in your pocket, treat the anchor like a trusted workout buddy, and you’ll never have to wonder “Did I set it up right?” again.
Ready to hit the next set? Grab the band, lock the anchor, and let the workout flow.
Step 5: Maintenance and Safety Tips
So you’ve been grinding through rows, presses and squats, and the anchor’s still holding strong that feels pretty good, right?
But the truth is, any piece of gear that sees daily tension needs a little love, otherwise the little things that keep you safe can slip away unnoticed.
Do a quick visual scan after each session
Before you roll up your mat, take a 10‑second walk around the door. Look for any frayed edges on the strap, loose stitching, or metal loops that look like they’ve taken a hit.
If something looks off, give it a gentle tug. A strap that stretches more than a fingertip under light pressure probably needs replacing.
Weekly deep clean and re‑tighten
Once a week, pull the anchor off the jamb and wipe down the fabric with a damp cloth. That removes sweat, dust and any sticky residue that could reduce friction.
While it’s off, rotate the strap a full 360° and re‑thread it over the top of the door. This simple twist distributes wear evenly and often fixes a subtle wobble you might have missed.
Inspect the resistance band itself
Even the best band will develop micro‑tears over time. Lay it flat on the floor and run your fingers along the entire length. Any thin spots, cracks or a “hissy” sound when you stretch it are red flags.
Swap out any band that shows signs of wear – a broken band is the fastest way to turn a good workout into a trip to the ER.
Keep the anchor’s latch tight over the long haul
After a few weeks of use, the latch’s spring can lose a bit of bite. Test it by pulling the strap hard in opposite directions. If the latch clicks but then wiggles, give the screw a tiny turn with a flathead screwdriver.
Don’t over‑tighten, though – you just want enough resistance to stop the latch from popping open under load.
Quick safety checklist you can stick on your fridge
- Is the strap free of frays or tears?
- Does the latch stay locked when you pull hard?
- Are the band loops or D‑rings clean and undamaged?
- Has the door frame shown any new cracks or squeaks?
- Did you rotate the strap 360° this week?
Run through this list before you start a new workout. It takes less than a minute and saves you from a nasty surprise mid‑set.
Real‑world example
Imagine you’re a physiotherapist guiding a client through gentle knee extensions. After three sessions, you notice the strap’s edge is starting to lift away from the wood. A quick swap of the strap, plus a fresh wipe, restores the anchor’s grip and the client can keep progressing without fear.
Or picture a personal trainer in a busy studio. The anchor’s latch has loosened after a month of heavy 60‑lb bands. Tightening the latch screw and rotating the strap gives the anchor back its “rock‑solid” feel, and the class can finish strong.
When you treat maintenance like a warm‑up, the anchor becomes a reliable partner rather than a guess‑work piece of equipment.
Bottom line: the best way to master how to use resistance bands with door anchor is to respect the gear. A few minutes of inspection, a little cleaning, and a regular tightening habit keep the anchor safe, stable and ready for whatever workout you throw at it.
FAQ
What is the best way to set up a door anchor for resistance bands?
Start by choosing a solid wood or metal door – hollow‑core doors just won’t cut it. Open the door about an inch, slide the strap over the top jamb, and pull it tight until you feel a firm pinch. Click the latch, give the band a gentle tug in opposite directions, and if anything wiggles, rotate the strap another quarter turn. That quick test saves you from a mid‑set surprise.
How can I tell if my door anchor is still safe after a few weeks of use?
Do a visual scan every time you finish a workout. Look for frayed edges, loose stitching, or a metal loop that’s bent. Run a finger along the strap – if it stretches more than a fingertip under light pressure, replace it. Finally, pull the band hard in both directions; the latch should stay locked. A 10‑second check keeps the anchor reliable and protects your joints.
Can I use the same anchor for both upper‑body and lower‑body exercises?
Absolutely. Most door anchors come with multiple loops and D‑rings at different heights. For rows or chest presses, attach the band to a chest‑height loop or top D‑ring. For squats, lunges, or leg extensions, slide the band onto the bottom D‑ring. Just make sure the strap stays tight after you switch positions – a quick re‑tighten and test pull is all it takes.
What should I do if the anchor’s latch feels loose during a set?
Stop the set immediately and give the latch a firm click again. If it still wiggles, use a small flat‑head screwdriver to tighten the screw on the latch just a notch. Avoid over‑tightening; you want enough resistance to keep the latch from popping but not so much that the strap tears. Once it’s snug, retest the band in both directions.
Is it okay to use a door anchor on a painted door?
Yes, but protect the finish. Slip a thin rubber pad or a folded towel between the strap and the door frame. The pad spreads the pressure, prevents paint from chipping, and actually adds a bit of friction, which can make the anchor feel more secure. Just remember to wipe off any sweat or residue after each session so the pad stays sticky.
How often should I rotate the strap 360° and why?
Rotate the strap once a week or whenever you notice a slight wobble. Turning it a full circle distributes wear evenly across the fabric and the door jamb, which helps maintain a consistent grip. It also gives you a chance to inspect the strap for hidden frays. A quick 30‑second twist is a tiny habit that pays off in long‑term stability.
What are some quick troubleshooting steps if my band snaps during a workout?
First, stop the exercise and check the band for visible tears or a “hissy” sound when you stretch it. If the band is damaged, replace it right away – a broken band can damage the anchor or your shoulder. Next, inspect the anchor strap for any wear that might have contributed to the snap. Finally, test the new band with a light pull before you resume the set.
Conclusion
We've walked through every step of how to use resistance bands with door anchor, from picking the right door to keeping the gear in top shape. By now you should feel confident that a sturdy door, a snug strap, and a quick safety pull are all you need to turn any doorway into a reliable workout station.
Remember the little habits that make a big difference: rotate the strap weekly, wipe down sweat after each session, and give the band a light test pull before you dive into sets. Those seconds of attention save you from wobble, wear, and unwanted surprises.
Think about the last time you improvised a workout on the go – imagine swapping that makeshift setup for a polished FitCore door anchor. You get smoother reps, safer form, and more time focusing on the muscles you want to train, not the equipment you’re wrestling with.
So, what’s the next move? Grab your favorite resistance bands, hook them onto a solid door using the anchor, and start experimenting with rows, presses, or lunges. Keep the checklist handy, stay consistent with maintenance, and watch your home‑gym performance level up.
Ready to make every doorway a strength hub? Check out FitCore’s range of door anchors and give your routine the portable, dependable edge it deserves.